There is something extremely satisfying about opening up your gun case and being greeted by your favorite firearms professionally laid out in custom configuration with cuts so clean, it looks like it was made by the factory. All of the items are flush with the top of the foam and the weight is evenly distributed throughout the case. I will show you how to do it using a homemade hot-wire cutter.
PART #1 of 2
PART #2 of 2
It seems that most people are using the "turkey knife" method to cut their case foam, which utilizes a cheap electric turkey knife. While this is definitely the easiest method, you are unable to make intricate cuts and the end result generally looks like an amateur hack job. Do yourself a favor and don't go there because you will forever be wishing you had done it a better way. That better way is building a simple homemade hot wire cutter that will cost you around $50.00.
First of all, you will need a case sized to fit your items and it will either need to already come with "solid core" foam, or you will need to purchase a sheet of foam to fit your case. This method does not work well when using the "Pick and Pluck" foam that some of the cheaper cases come with. If you really want that clean cut look, ditch that pick and pluck foam. I decided on one of the most proven cases in the industry, the Pelican 1720.
PLANNING AND POINTERS
Planning the layout of the case is extremely important and you will want to dedicate adequate time for this step because once the foam is cut, there is no going back. You can always purchase a new set of foam if you want to change things later, but it can start to get expensive very fast. If you need spare foam for the Pelican 1720, it's best to get the whole 3-piece foam replacement kit (Pelican 1721).
Here are a few pointers that will make the project easier:
- Ensure that all of your attachments are on your firearms first (optics, grips, etc.)
- Place your firearms and accessories on top of the foam to determine the best arrangement
- When deciding the layout, consider the weight of items and loaded mags and distribute the weight effectively
- Leave at least 1 inch of non-used space around the perimeter of the case foam to give you a protective "bumper"
- Trace the items using a non-smudging pen or sharpie and make sure the lines are clearly visible
- When cutting, keep all of the shapes you are cutting out. You will use them again to raise shallow items to the top
HOT WIRE CUTTER
First off before we begin, I want to offer those people that don't want to go through everything below an option to purchase a nice, factory-made hot-wire cutting table that won't cost an arm and a leg. If you want to just buy a really nice cutter for less than $130 (and free shipping), then take a look at this link:
Complete Hot-Wire Foam Cutting Machine / Table (Not Pictured Here)
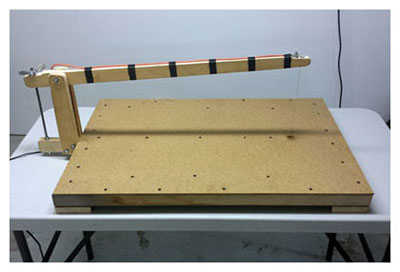
Now, on to building our own! I will not waste your time with the exact dimensions or screws I used to build my cutter. Everyone will want to build theirs a little differently and of different sizes to suit the needs. The important thing is to get a good idea of how it works and what you will need to power it. With that information, you should be able to come up with a plan to build your own.
A friend helped me build the wooden structure of the cutter while I did the electric and wiring. Remember, the base structure could have been done 100 different ways so keep that in mind when building your own. The important part is to have a large base that you can move the foam around on with a "bow" hovering above to hold the cutting wire that goes down through the base surface. The bow needs to be somewhat vertically adjustable so you can increase or reduce tension on the cutting wire.
HOT WIRE FOAM CUTTER: BASIC WIRING DIAGRAM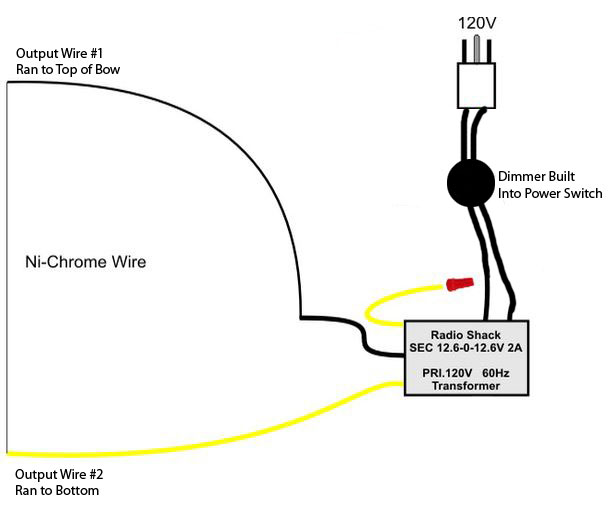
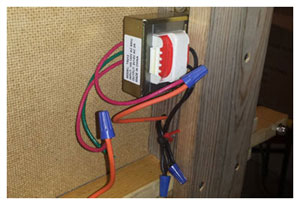
ELECTRICAL COMPONENTS: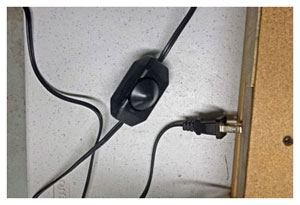
- 120v lamp cord with built in switch/dimmer
- 120v to 12v transformer 6v + 6v AC 2A (24v - 12v + 12v for more power)
- 12ga power wire
- 26 or 28ga kanthal or nichrome wire (for cutting)
- Metal Eyelets or Compression Fitting Inserts x2
- Twist-on wire connectors
- Steel bolts to anchor cutting wire
You should be able to pick the components from just about any local electronics supplies store like a RadioShack. If you cannot find everything you need locally, Amazon generally has everything with free shipping.
 Power comes from the wall using a typical 120v "lamp cord" with a built in switch/dimmer so that you can control the amount of power going to the wire. You could also rig up a foot switch from a sowing machine enabling you to turn it on and off with your foot. If I were to do the project again, I would absolutely use the foot-switch method.
That 120v power is then fed into a transformer that converts it into two 6v leads. Together, those two 6v leads total 12v of power at about 2 amps. This is enough to turn your cutting wire red-hot.
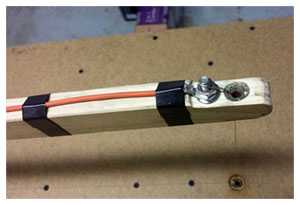 Run one of those 6v leads to the top of the cutting wire, along the bow and anchor it to a bolt that protrudes out the top of the bow. Run the other 6v lead along the under side of the table to the bottom of the cutting wire and anchor it to another bolt that protrudes out the bottom. The cutting wire will be anchored to these bolts later.
Insert metal eyelets (compression fitting inserts also work great) through the wood directly in front of the anchor bolts in the top bow and also the bottom base (two total). Your cutting wire will be fed through the eyelets and they will prevent the wire from burning the wooden table. The last thing you want is for your cutting table to go up in flames!
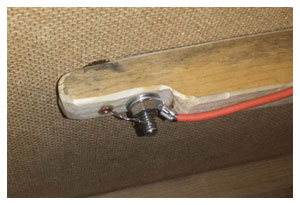 For the cutting wire, I have been using kanthal 26 or 28 gauge (nichrome wire works great too). It is very important to get the wire vertically level so you do not end up with angled cuts in your foam. Adjust your top bow as needed to make sure the cutting wire is level.
The cutting wire needs to be wrapped around the lower bolt (under the table) as a semi-permanent anchor. From there, run it through the copper eyelet up through the base of the table. Then, you make a "loop" with the loose end of the cutting wire. Run that loop through the upper copper eyelet of the bow and anchor it to the top bolt.
Now, with the wire attached to both the upper and lower bolts, you can adjust the tension on the bow to either tighten or loosen the cutting wire. You can also remove the wire easily from the top of the bow to go through the foam by loosening the tension on the bow, slipping the wire off of the top bolt, run it through a slit in the foam and then loop it back over the top bolt and tighten the tension back up.
TRACING AND CUTTING THE FOAM
See the main video above (at the top of this article) for a complete tutorial on tracing everything and cutting the foam. It can be a long process, especially depending on how complex your layout is. However, the end results speak for itself.
*NEW: PLASTI DIPPING THE FOAM
As of March 4th, 2017 I finally created and added 'Part 2' of the custom gun case foam tutorial videos! This new 'Part 2' video covers the Plasti Dipping process and the final end results. See the video above (at the top of this article). Good luck!
