Trying to figure out the best way to get our artwork packaged up for ground transport was not as easy as I had hoped. Initially, we were going to have "The Packaging Store" box it but they wanted $160 and what you end up with is basically plastic and bubble wrap in a custom sized cardboard box.
 My wife and I will be traveling down to Arizona from Alaska, towing a trailer with us and half a dozen original mixed media paintings that I really want to arrive without incident. Besides the obvious risk of being physically damaged through the cardboard, I read multiple horror stories about people wrapping paintings with bubble wrap leaving indentations all over or plastic wrap that ends up sticking to the front.
I decided to try my hand at creating a simple sturdy wooden crate that floats the canvas so nothing can touch the sides, front or rear except for a few metal brackets screwed into the back of the wooden canvas frame. The end result is complete protection with the painting sealed in its heavy-duty crate.
In total, it cost me $65.00 for all parts needed. That includes the wood, metal brackets and screws saving me a total of almost $100.00. The cost wasn't the driving factor though. It was the question of "How do we protect the art as best as we can?".
SUPPLIES
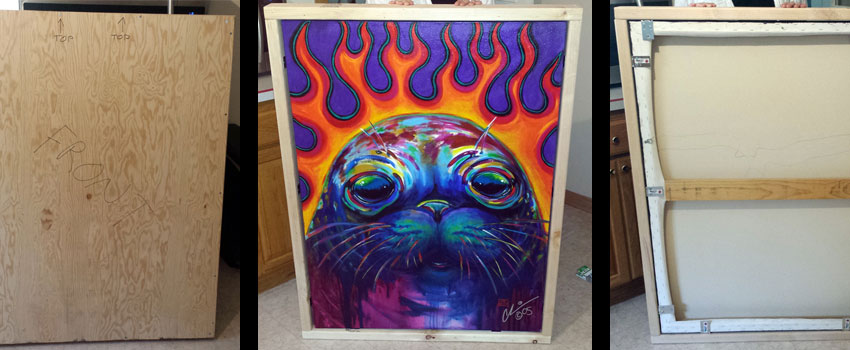
Obviously your supplies will be different than mine to suit your particular painting. This is a list of everything I used for our larger "Flaming Seal" painting which is 48"H x 36"W x 2.5"D.
- 2 4'x8' sheets of 1/2" or 5/8" plywood
- 2 8' long stud boards 1.5"H x 3.5"W
- 10 metal L brackets 2" x 2"
- #8 2.5" wood screws
- #8 1" wood screws
- #8 5/8" wood screws
TOOLS
There are very few tools involved, especially because I used the bed of my pickup instead of saw horses.
- SkillSaw 10"
- Electric Screwdriver
PROCESS
 Even though the process is not very difficult, I am going to break the steps down into a few different sections (Measurements / Framing / Brackets / Walls).
1. Measurements
First step is to determine the length of the boards and the size of the front and back plywood walls. I decided to leave 1/4" free space around all 4 sides because that would place the screw holes on the brackets right on the center of the canvas frame. Therefore, taking into consideration that air space and also the width of the boards I am using (1.5"), I would need two 48.5" long boards for the left and right sides and two 39.5" long boards for top and bottom. The front and rear plywood covers will both have to be 51.5"H x 39.5"W.
2. Framing
After cutting the boards and plywood to the correct size, next is screwing together the heavy-duty wooden frame using the four boards and the #8 2.5" wood screws. The easiest way is to lay the boards out on a flat surface (like a tile floor) and place them together in the shape you want. I put two screws in the end of each corner to attach the four boards to create the frame.
3. Brackets
 Now things start to get a little tricky because I want to screw all of the brackets into place on the frame first. The boards are 3.5" deep and my seal painting is 2.5" deep. Therefore, I will have 1" of air space to distribute for front and back. I decided to leave 1/4" air space in the back and give 3/4" in the front. That means that with the frame still lying on a flat floor, I will need to raise the brackets 1/4" off the floor and then screw them in (essentially putting them inside the frame, 1/4" from the back).
Luckily, I have a couple cutting boards from the kitchen that are exactly 1/4" thick. I laid the cutting board on the floor and placed the brackets on top, hold it in place and use the #8 1" wood screws to screw the brackets on. Because of the size of the seal painting, I ended up using 10 brackets total.
Once all of the brackets are secured in place, it is time to get the painting in and screw the brackets to the canvas frame. My wife helped me with this part. We stood the wood frame upright, placed the two cutting boards on the bottom part of the frame (to prop the art up 1/4" and eyeballed all sides to make sure there was even space all around. I then put two #8 5/8" wood screws through each bracket into the back of the canvas frame. The painting is now firmly mounted within the frame and ready for the front and back plywood.
4. Walls / Front And Back Covers
Now that the painting is in its crate, the last step is to attach the front and back walls. Make sure you wipe down the sheets of plywood to remove any leftover sawdust or other particles before screwing them on. Lay the crate frame down on the floor and place the plywood on top very carefully so it is perfectly centered. Staying about 3/4" from the outside edge, insert a #8 1" wood screw through the plywood into the frame boards about every 10" all the way around. Flip the crate over and do the same for the other side and you are finished!
CONCLUSION

You can't beat a heavy-duty, custom sealed wooden crate for only $65.00 and a couple hours of your time. Yes, this beast is heavy and a bit bulky but would you trust your original, one-of-a-kind artwork to survive a long journey in a cardboard box?