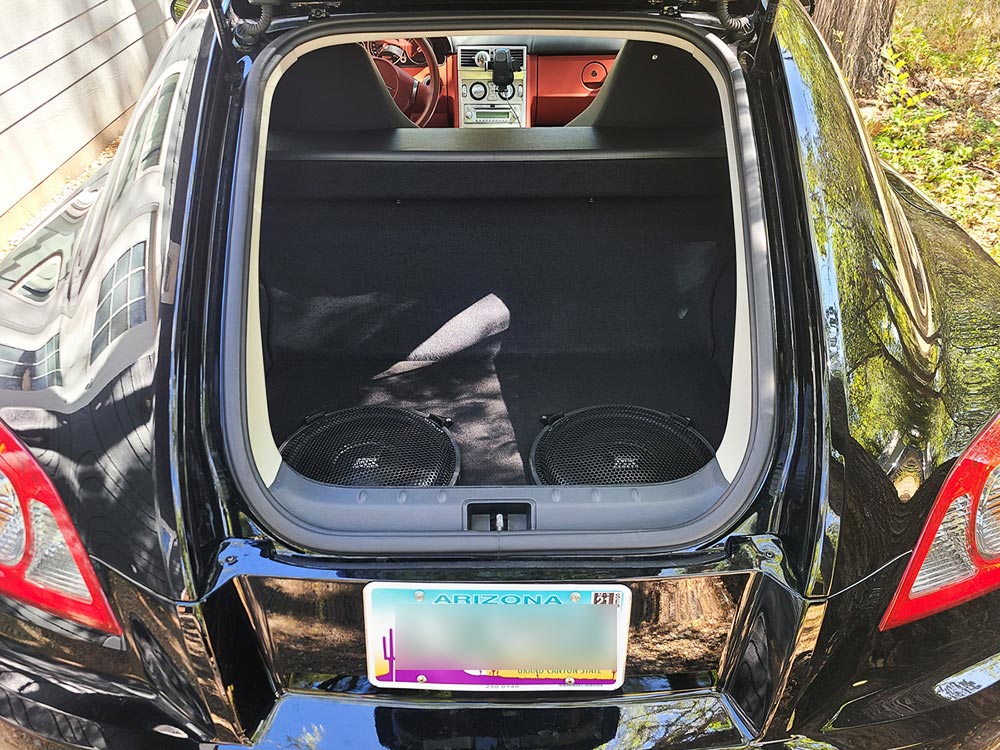
Even with limited space in a small Chrysler Crossfire Coupe, I was able to fit two 12" subs and only lose 5" of trunk space in a beautiful custom subwoofer box.
After researching all possible existing subwoofer enclosures for sale, I quickly realized that I was not going to find what I was looking for. My goals were as follows:
- Install two 12" subs into the rear of a Chrysler Crossfire Coupe
- WITHOUT losing the already small amount of trunk space
- WITHOUT losing the spare tire or safety equipment stowed away under the rear factory cargo mat
- WITHOUT cutting or drilling into any factory interior
While the above may seem like an impossible task after seeing the available space to work with, I had a great idea... Build a shallow custom box to sit flat on the floor with the two subwoofers facing up. I could then cover them with heavy-duty speaker grills and still be able to fill up the trunk space when needed and not worry about putting items on top of the speakers. If I could design the box shallow enough (and find badass shallow subs to fit), it would barely take up any space. The amplifier will go behind the driver's seat.
STEP 1: FIND AND ORDER SHALLOW SUBS TO FIT
There are a lot of really good shallow subs out there these days. Most all companies make at least one shallow model, so the biggest task was going through tons of consumer reviews to determine what subs perform the best vs. the price point.
After many hours of reading, I decided to try a set of MTX FPR12-4 12" shallow subs. They had the best reviews and at less than $150 each, they were a great deal. The amplifier I am working with is a Planet Audio 2600 (2-ohn stable), so I opted to get the 4-ohm single-voice-coil version of the subs so that I could then wire them together for a final load of 2-ohm.
Note that since purchasing my MTX subwoofers (FPR12), that particular model is no longer being produced and has been replaced with a newer version in the MTX lineup: The MTX 3512-04S. It has nearly the exact same specifications, reviews, and price point so I am providing a link below for you to see. I highly recommend MTX shallow subs!
STEP 2: SUBWOOFER ENCLOSURE PLANNING
Planning the subwoofer enclosure and layout ahead of time is very important. For this build, I planned to keep the overall height of the completed box at only 5" tall to ensure that no storage space in the trunk is lost. Therefore, I decided to use 3/4" high-density particle board for the top and bottom and opted to use regular 2x4 boards for the enclosure walls because they are a standard width of 3.5" and when you add that to the top and bottom, it comes out at a perfect 5" with limited additional work.
I planned to have separate speaker chambers (sealed with caulk) and to carpet the top with black automotive-grade carpet when completed. I also wanted the box to run perfectly along the curves of the trunk space, so I knew there would be a lot of time involved in matching up the lines and trial-and-error fitting.
In order to create my initial "templates" for the top and bottom of the enclosure, I opted to cut up a large cardboard box and use the cardboard to create the templates.
STEP 3: COMPONENTS FOR THE CUSTOM BOX
Now that I had a solid plan, it was time to purchase all of the components to actually build the enclosure. Here are the final box components I ended up purchasing, including the speaker wire and the speaker terminal:
- One 4x8 sheet of 3/4" high-density particle board
- One large 48x48 cardboard box
- Two 4ft 2x4 boards (1.5" x 3.5")
- Box of 2" drywall screws (black)
- Box of 1" drywall screws (black)
- Flex Glue Rubberized Waterproof Adhesive Caulk
- 12-Gauge Red and Black Speaker Wire - 100ft
- Speaker Box Terminal (Cup-Style Binding Posts)
- Custom Accessories Black Automotive Carpet (36x72)
- 3M Hi-Strength 90 Spray Adhesive
- 12" High Excursion Speaker Grills
- Universal 12" Speaker Waffle Grills (Pair)
STEP 4: ESSENTIAL TOOLS FOR THE PROJECT
Before you can begin building your custom box, you will need to have all of the right tools for the job on-hand. Here are all of the tools I needed to complete the project:
- Phillips screw driver
- Heavy-duty scissors
- Pencil and fine-point Sharpie marker
- Various size drill bits
- Electric screw driver / drill
- Electric jig saw
- Extension cord
- Beam / box level
- Tape measure
- Wire strippers
- Wire cutter / snips
STEP 5: CREATING TOP AND BOTTOM TEMPLATES
Now to begin the build! First thing, you must create the cardboard templates for the top and bottom of the subwoofer enclosure. This process essentially involves the following:
- Measure the inside of the trunk floor and roughly cut out a piece of cardboard that is a bit larger then the bottom of the trunk space. This will be for the bottom of the enclosure. You will be trimming off bit-by-bit, so make certain that you start with a piece that is LARGER than the space you are working in because you will need to start over if you cut too much off.
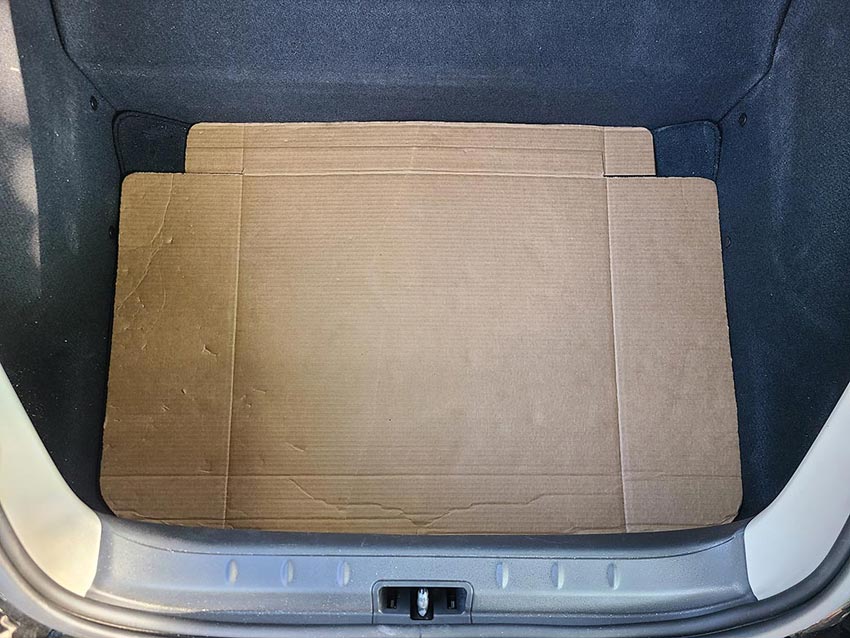
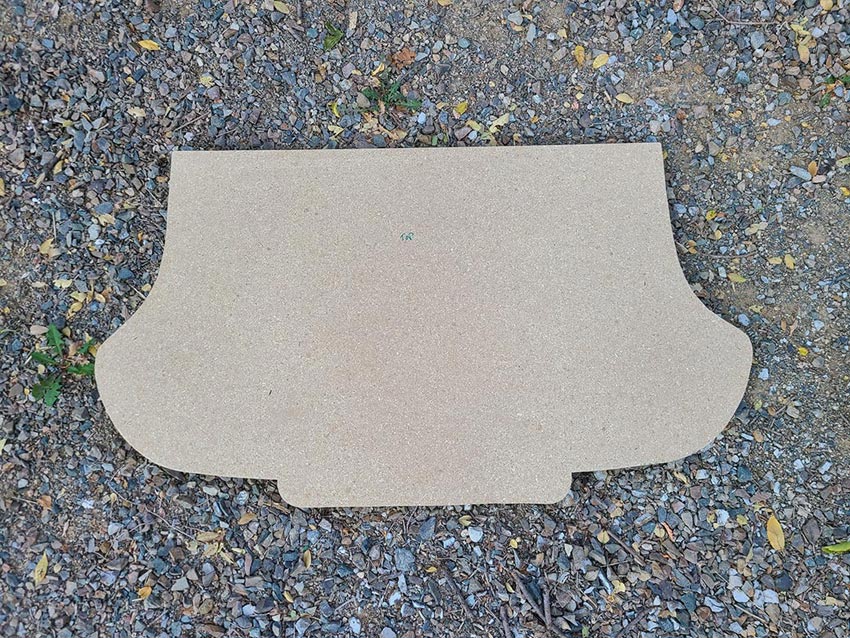
- Lay the cardboard into the trunk and begin trimming off bit-by-bit and test-fitting between each cut. The goal is to be able to lay the piece of cardboard perfectly flat in the bottom of the trunk and have it fit snugly and lay flat (note the notches in the upper-left and upper-right corners). Keep trimming until you have a really good fitting piece like this:
- Now, set the bottom template aside and begin on the top template. As with the bottom template, start by cutting out a piece that is slightly larger then the entire area you will be working with. Note that the top piece will be considerably wider than the bottom due to the "wings" on each side.
- When test-fitting the top template, you will want to measure and hold the cardboard up above the floor at the 5" mark. This will ensure that the curves you are trimming for will align properly all around.
- Trim bit-by-bit until you have a really good fitting piece. Test for trial-and-error fitting between each and every cut.
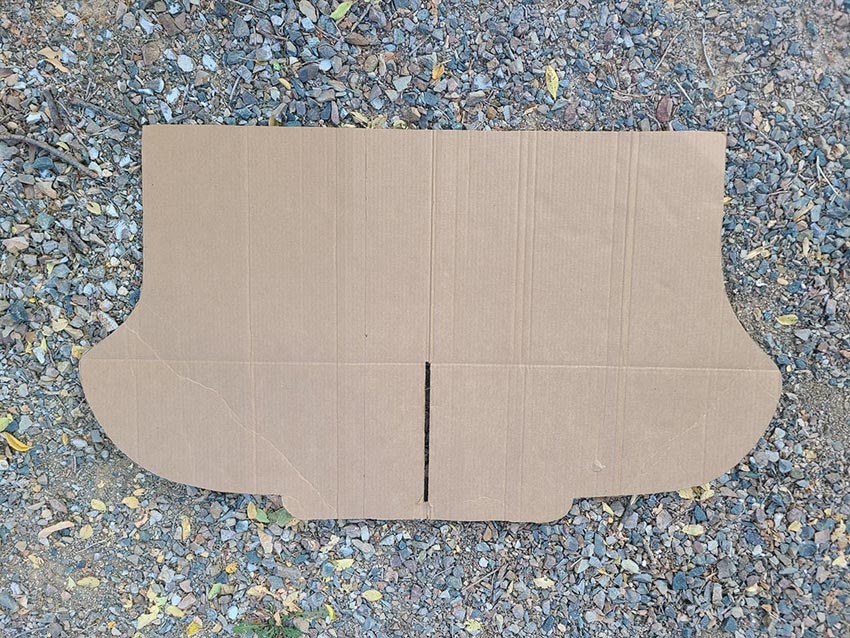
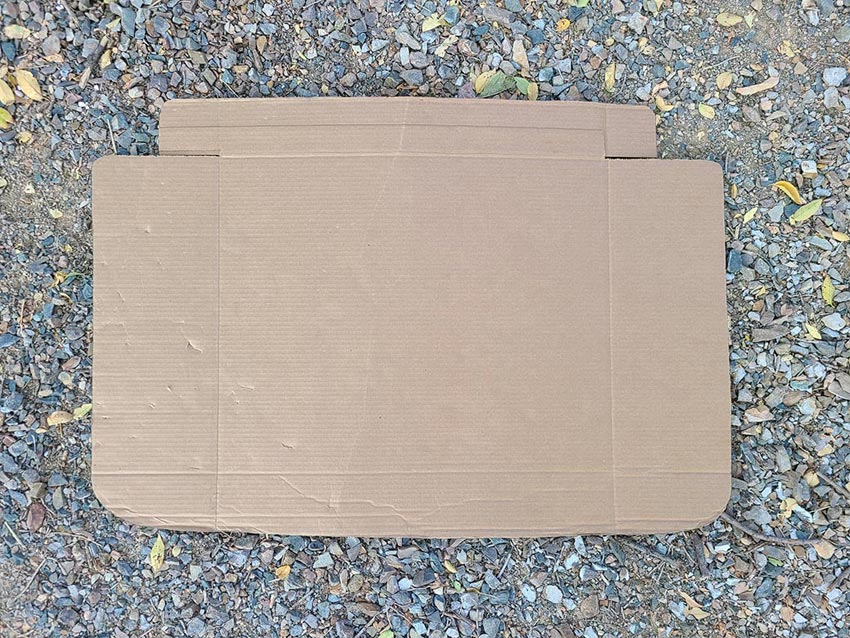
- Eventually, you will have two finished cardboard templates that look similar to this:
STEP 6: CUTTING AND FITTING TOP AND BOTTOM BOARDS
You are now ready to begin cutting and fitting the actual wooden enclosure top and bottom pieces. This process will be similar to the one you used to create the cardboard templates (trimming and test-fitting) so remember not to take too much off as you go. You can always trim a little off, but you cannot add more if needed.
- Using your cardboard templates, trace the top and bottom pieces on your sheet of 3/4" particle board using a sharpie. Then cut them out carefully using a jigsaw.
- Begin with the bottom. Place the bottom piece into the vehicle and make sure it fits perfectly and does not get hung up on anything. Trim where needed and re-test the fitting until it's perfect. Then remove and set the piece aside.
- Next, place the top piece into the vehicle and remember to measure and hold it up 5" from the bottom to accurately test the fitting (the TOP of the board should be exactly 5" from the floor). Trim where needed and re-test the fitting until it's perfect. Note that you will need to spend a lot more time trimming and test-fitting the top (as opposed to the bottom) because it's much more intricately curved and it's the one piece that everyone will see.
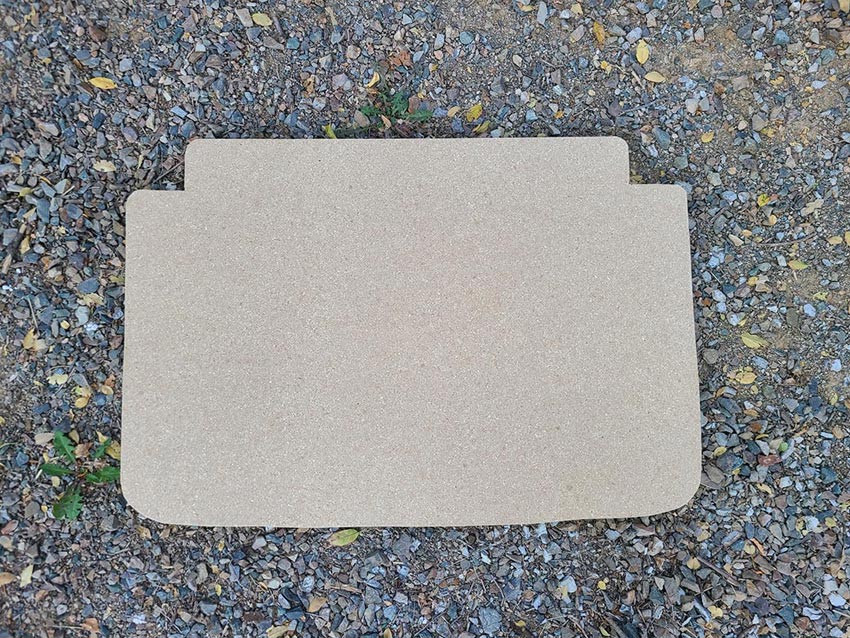
- You should now have the top and bottom boards trimmed and fitting well. They should look like this:
STEP 7: BUILD THE BOTTOM OF THE SUBWOOFER BOX
The next step is to begin building the bottom portion of the box. This process includes cutting the 2x4's and mounting them to the bottom board.
- Lay the bottom board flat on the ground. Measure the width and height of your board (while leaving a little space around all sides).
- Cut the 2x4's to fit. You should have long boards on top and bottom, with shorter boards to to the left, right, and in the center.
- Note that your 2x4 lengths will be different than mine, as each enclosure will be different. My top and bottom 2x4 pieces were about 29" long. My left and right sides were about 17" long. My center piece was 14" long.
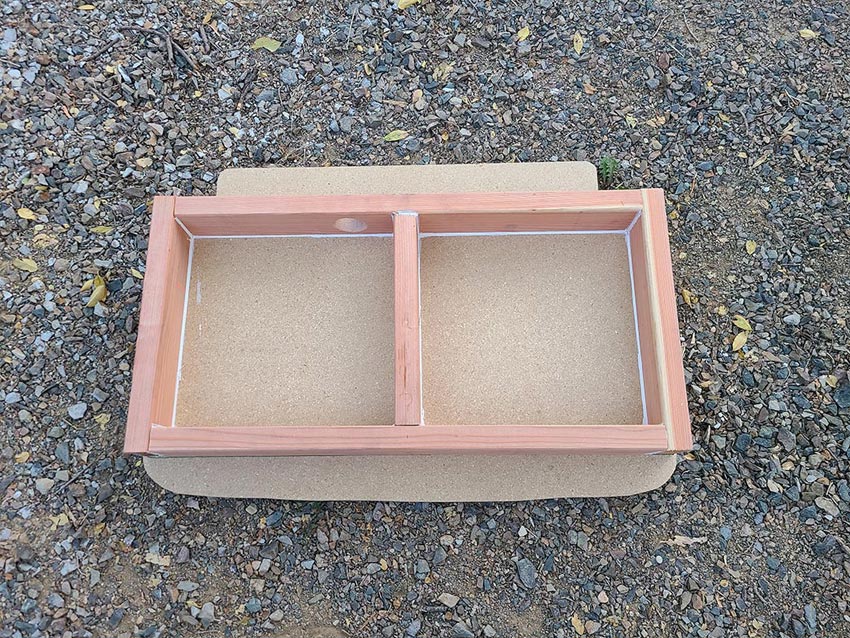
- Lay the 2x4 pieces together on top of the bottom and make sure they all fit as intended. You should have a rectangle split into two chambers.
- If everything fits well, use the 2" drywall screws to screw all of the 2x4 pieces together and then attach all of the 2x4 pieces to the bottom board (from the underside). Use as many screws as needed to secure everything very well.
- After the 2x4 pieces are all attached to the bottom board, go ahead and run a strong bead of caulk in all the inside corners to seal it all up.
- Mark and cut out the circular hole for the speaker terminal cup (offset to one side, not directly in the center).
- Drill a small hole in the center divider, just barely big enough to fit the speaker wire through from one chamber to the other. It should look like the following:
STEP 8: PREPARE THE TOP OF THE SUBWOOFER BOX
Before you can attach the top of the box, you first need to prepare it by marking the wall locations and cutting out the speaker holes for mounting.
- Lay the top of the box on the built lower portion and eyeball it's placement as close as you can, imagining how it will fit into the vehicle after completion.
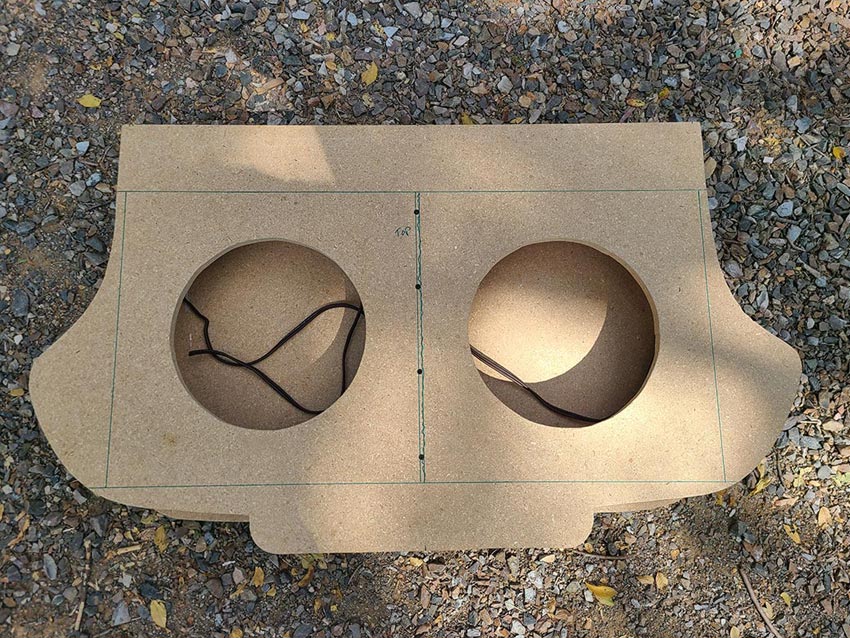
- Mark the outline of the walls beneath so that you can identify the center point of each chamber. This will allow you to properly place and cut out the holes to mount the speakers. It should look similar to this:

- Next, using the 4-corners of each chamber and your box level as a straight edge, draw an X to identify the exact center point of each chamber.
- Now, you can draw your circles (11" diameter for MTX subs) for each chamber and cut them out with the jig saw.
- Place your sub in each mounting hole after cutting to ensure that they fit (don't screw them in, just test-fit). Trim as needed until the subs are a perfect fit.
STEP 8: MOUNT THE TOP AND WIRE THE BOX
Things are coming together! At this point, you are ready to attach the top of the box. However, you will want to first wire everything up because it will be much harder to do that after the top is attached.
- Cut a piece of speaker wire about 16" long and strip about 1/2" of the wires on one end. Solder those stripped ends to the new speaker terminal cup.
- Insert the terminal cup into the box and screw it into place. Let the other end of the ~ 16" of wire just hang loose in that speaker chamber for now.
- Cut a piece of speaker wire about 24" long and run it through the tiny hole you drilled in the center divider between the two chambers with half of the wire hanging loose in each chamber.
- Fill the remainder of that tiny hole in the center divider (on both sides) with the caulking to seal it up as much as possible.
- Take the entire lower section of the box and carefully place it into the vehicle, laying perfectly flat on the trunk floor.
- Now, take the top of the box and also place it carefully in the vehicle, laying it on top of the lower section. It should fit perfectly flat on top of the lower box portion.
- By placing the top of the box on the bottom (while IN the vehicle), you are ensuring that the top aligns perfect with the vehicle curves.
- When you are certain that everything fits perfectly, attach the top to the bottom via ONLY THE CENTER DIVIDER with 4 screws. You want to have the top attached strongly enough to the bottom to be able to lift out the entire box as one unit from the vehicle. However, you will need to take the top off one last time before attaching it permanently, so don't go crazy with screws yet.
- Carefully remove the entire box from the vehicle. It should look like this:
- Unscrew the four screws from the center divider to remove the top from the box. Screw those four screws back into the top just enough so that they each protrude from the bottom of the board by about 1/4"... You will use those screws (and the holes they go into) to align the top in a moment when putting it back on.
- Run a healthy bead of caulking all along the tops of the 2x4's on the lower box section, in between where the top will mount to the box.
- Lay the top of the box down onto the lower section, making certain to carefully align those four screws precisely back into their holes. Screw those back in tightly.
- Finish securing the top to the lower box portion by screwing in 2" screws every 6 inches or so all around the chambers.
- IMPORTANT: This is the best time to do a final test-fit of the entire box to make certain that it is all correct and no further trimming needs to be done. Place the box into the Crossfire and make sure it slides all the way down to lay flat on the floor. You may need to be crafty with how to get it in and be careful not to scratch the car or damage any interior. Remember, you should have at least 1/8" of space all around the top of the box to accommodate the carpet you are about to add. If it fits, you are good-to-go. If needed, make some more final trimmings before moving on to the next step.
- The box should now be ready to carpet and install speakers.
STEP 9: CARPET THE SUBWOOFER BOX AND INSTALL SUBS
Now comes one of the more tedious parts of the project... Carpeting the subwoofer box and then installing the subs. Many people will simply spray the top of the box with glue, lay down the carpet and cut off any excess around the edges. However, in addition to gluing it, I always WRAP the carpet completely around the edge and tack it from the underside. This makes it nearly impossible for the carpet to come off the box in the future.
- Lay the box on the ground (outdoors) in a place where you don't mind a little overspray of glue.
- Place the carpet on top of the box and roughly cut out the shape, leaving a good 2-3 inches extra around all sides.
- Places pieces of paper inside the box in each chamber to catch glue spray that goes inside the box.
- Turn the carpet upside down and flat (bottom-up) and place it next to the box.
- Using the 3M adhesive, spray 2-3 coats over the entire top of the box and also over the carpet backing (leaving 2 inches or so all around the edges without glue if possible), moving quickly.
- BE CAREFUL NOT TO GET ANYTHING ON THE TOP SIDE OF THE CARPET!
- Let the glue get tacky (1-2 minutes) and then attach the carpet to the TOP of the box, starting with the center and using your hands to flatten it out to all sides. You should end up with a nice, smooth carpeted top, free of any defects.
- Don't attach the side or wrap the bottom quite yet. That will be next.
- Lay down something flat and clean (maybe a sheet of plywood) on the ground and then turn the partially carpeted box upside down (carpet facing down) nice and flat and let the glue dry for 30 minutes or so.
- With the box still upside down, carefully spray adhesive along the extra carpet around the side, along the very edge of the particle board top, and about an inch along the underside of the particle board top. I would not recommend doing all around the entire box at once, rather pick about 18" at a time, slowly working your way around the box. This will give you the time to wrap the carpet around and tack it down before moving on to the next section.
- Let it get tacky (1-2 minutes) and then carefully wrap the section you are working with around the edge and fold it over to the backside. Make small cuts as necessary to ensure that the carpet lays smoothly around the curves. The adhesive should hold it fairly strongly, at least enough for you to grab your hammer and 1/2" tacks.
- Hammer in tiny tacks from the underside of the top, every 4 inches or so as needed to secure the carpet from the underside.
- Cut off any excess carpet.
- Turn the box right-side up so you can see your fresh new carpet. Wipe off and clean any debris from the carpet so it looks great. Let it finish drying for at least another hour or so.
STEP 10: INSTALL THE SUBWOOFERS IN THE BOX
Now it's time to cut out the carpet over the speaker holes and mount the subs.
- Using your hands to feel where the speaker holes are under the newly attached carpet, take a sharp blade and cut out the carpet over the speaker holes, leaving about 1/2" extra carpet.
- Reach in and remove the paper that you used to catch glue overspray and discard that paper.
- Strip the ends of the speaker wire in both chambers and plan to wire your subs according to the ohm load of the amplifier you will be using.
- Set the subs on top of the box (next to each chamber) and wire the subs.
- Now, set the subs down into their respective speaker holes. They should be snug but fit good.
- Screw the speakers in to secure them using 1" screws.
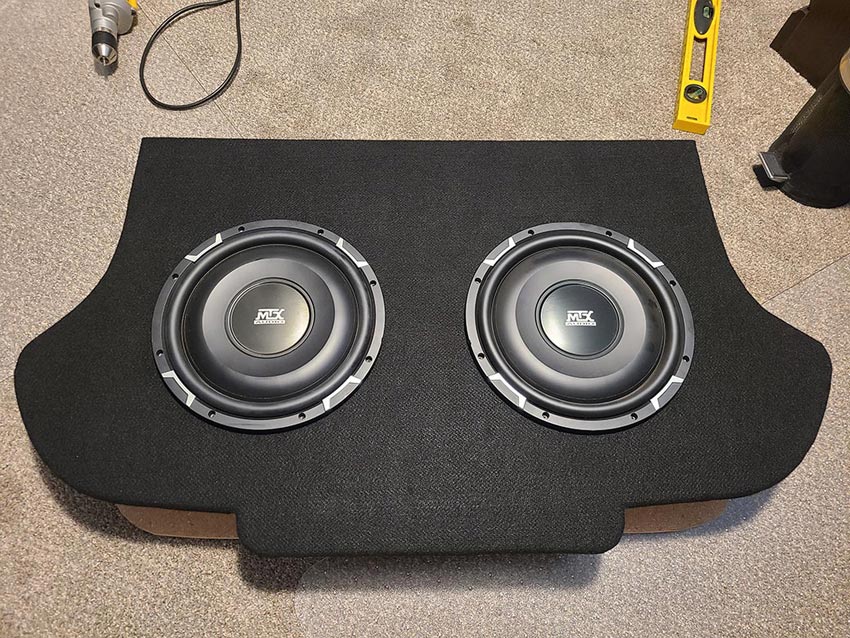
- At this point, the box is essentially done. It should look like this:
STEP 11: INSTALL THE CUSTOM SUBWOOFER ENCLOSURE
Finally, you can now install your new custom subwoofer enclosure into your Chrysler Crossfire.
- First, cut a nice long section of speaker wire (10 feet or so) to attach to the box, because you won't be able to easily get to the speaker terminal after it's installed.
- Strip 3/4" off the end of the speaker wires and securely attach them to the speaker terminal, always making sure positive and negative are correct.
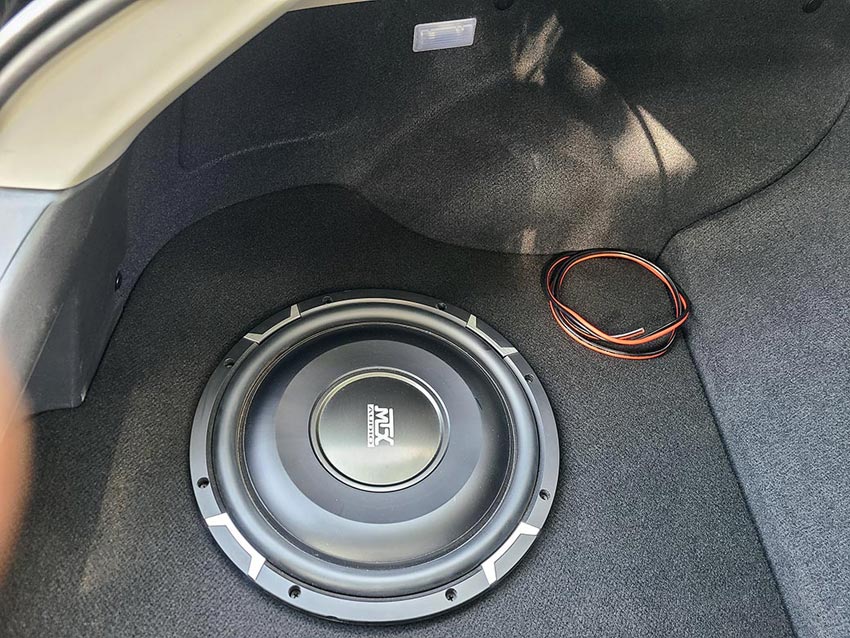
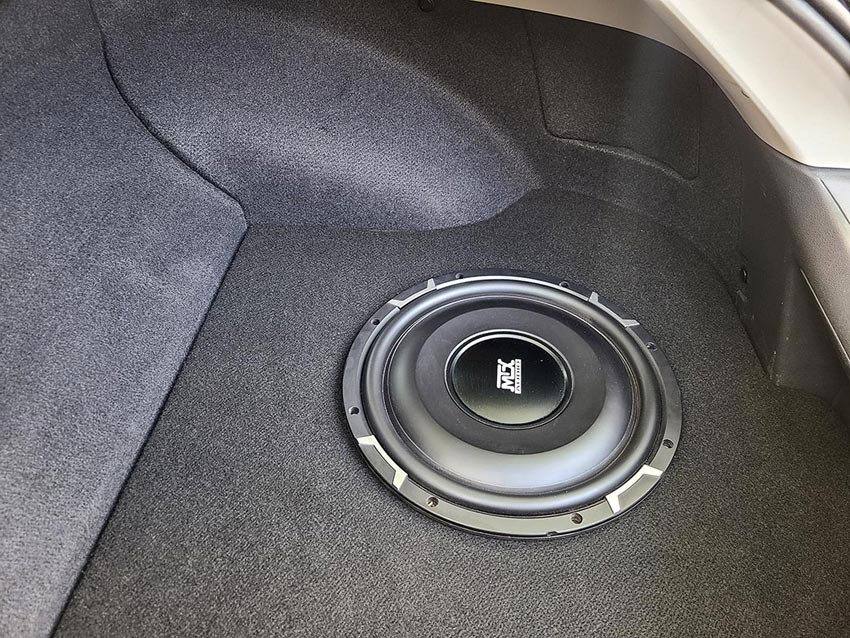
- Carefully lower the speaker box down into the trunk area until it sits flat on the floor, careful to allow the speaker wire to remain on top (without getting pinched). This will allow you to easily run the speaker wire to your amplifier.
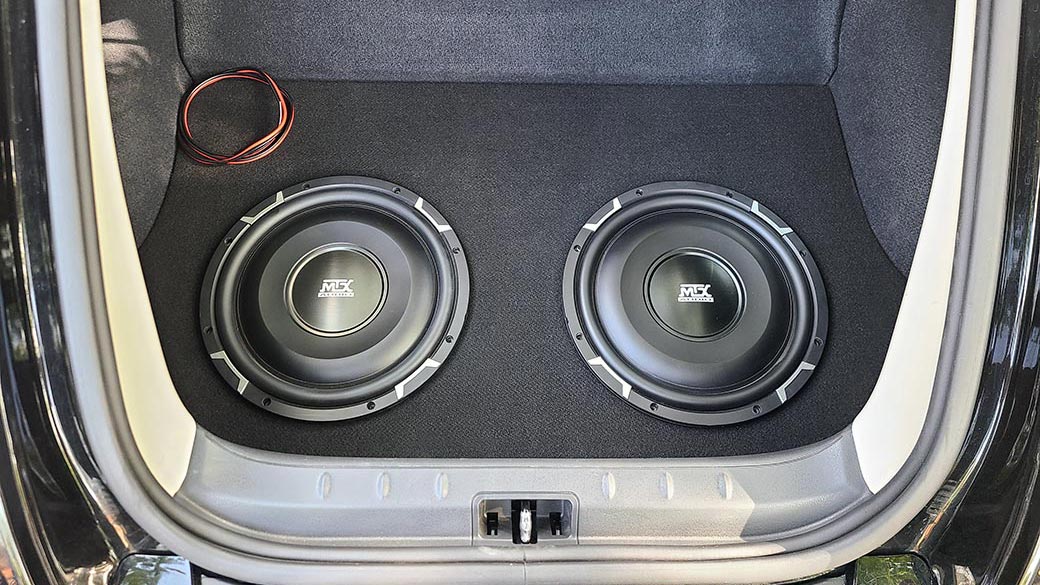
- Your box is now officially installed! Your completed enclosure should look and fit very snugly, like this:
STEP 12: INSTALL THE HEAVY-DUTY SPEAKER GRILLS
The final step was to install some slightly customized heavy-duty speaker grills. This ensures that items could still be placed on top of the subs without causing any damage, as the whole goal of this box was to not lose any of the already small amount of usable trunk space. This last part was a bit convoluted, because I ended up having to order two different sets of speaker grills... one to use, and the other to simply steal the rubber surround for the grills that actually went on the subs.
The reason for this is that I wanted to use a "high-excursion" grill that is extra tall to allow the speaker to really move without hitting the grill. However, that grill didn't come with a rubber surround, it came with a really crappy hard plastic ring that rattled badly. Therefore, I also ordered the set of traditional "waffle grills" that were not tall enough to use, but did have the rubber surround that I wanted and the clips to mount them with.
Here are the steps I took to complete the box with nice custom high-excursion grills:
- Removed and threw away the hard plastic rings that came with the high-excursion grills.
- I found that the dip in the center of the high-excursion grills would hit the center speaker cones and therefore needed to be raised up. This may only apply to my scenario (you may not need to perform steps 3 through 6 below).
- Put the high-excursion grills upside down on a carpeted floor (or on a thick rug).
- Using a hammer and a 1/2" thick felt pad between it and the grill (to avoid damaging the finish on the grill), hammer out the curvature of the center portion of the grill, hammering only 2-3 times in each spot and them moving it around to evenly flatten out the curve all around.
- Repeat for the other grill.
- What you should be left with is a fairly even "dome", as opposed to the concave curvature that it came with (see final image below).
- Now, carefully remove the rubber surround from the universal waffle-grills and set the grills aside (will not be using them).
- Carefully wrap that rubber around the high-excursion grills.
- Use the plastic clips that came with the universal grills to mount the grills to the speaker box, using 1 1/4" screws.
- You should need 4 clips per speaker to attach the grills.
SUMMARY AND ADDITIONAL RECOMMENDATIONS
Although each speaker only has about half of the recommended air-space per speaker, they hit INCREDIBLY HARD and sound amazing! I have my amp gain turned nearly all the way down and the sound is just intense.
Keep the total air space in mind when building your custom box project and adjust your box height accordingly. Yes, you would lose a bit more of your usable trunk space for each inch you raise the total speaker box height, but you will be gaining interior air-space for potentially larger and more powerful speakers.
Good luck!